
WooCommerce
Scalapay provides a ready-to-install extension for WooCommerce stores.
❤ Plugin installation
❤ Plugin configuration
❤ General settings
❤ Split fee
❤ Scalapay widget
❤ Restriction settings
❤ Checkout page
❤ Plugin installation
Download here the latest version of our plugin for WooCommerce: Scalapay for WooCommerce.
❤ Plugin configuration
Follow these steps to configure the plugin.
- Login to your admin panel. The URL should follow this path: yoursitename.com/wp-admin/

WooCommerce backend login
- To proceed with the Scalapay module configuration, select from the left menu: Plugins → Add new plugin

Add new plugin on WooCommerce backend
- The following screen will appear. Click on Upload plugin.

Upload plugin on WooCommerce backend
- Click on the navigation button and select your scalapay zip file using the popup window.
- When you click on "Install now", the plugin will be uploaded and installed but not activated.

Install the Scalapay plugin
- Click on "Activate plugin": you will be redirected to the plugin configuration page. Here you can start configuring your plugin according to your contract and your needs. Save the settings.

Activate the Scalapay plugin
To configure the plugin you can also go to the list of plugins. Find Scalapay and click on "Settings".
The plugin is divided into three tabs:
- General settings: in this tab you will find the plugin general settings and you will add the Live API key once the plugin has been correctly installed, configured and tested.
- Scalapay product suite: in this tab you will find the settings of the Payment suite.
- Pay in 3: in this tab you will find all the relevant settings to activate and configure Scalapay Pay in 3.
- Pay in 4: in this tab you will find all the relevant settings to activate and configure Scalapay Pay in 4.
General settings
Here you will find the plugin general settings and you will add the Live API key once the plugin has been correctly installed, configured and tested.
- Test API key
When you install the plugin, the general test API key is set by default: qhtfs87hjnc12kkos. - Live API key
Once the testing phase has been completed, you will be provided with the Live API Key and you will be able to activate the plugin in Live mode. - Test merchant token (field present from version 3.8.1)
When you install the plugin, the general test merchant token is set by default: 8KDS3SPEL. - Live merchant token (field present from version 3.8.1)
Once the testing phase has been completed, you will be provided with the Live merchant token and you will be able to activate the plugin in Live mode. You will find your merchant token on your Scalapay Merchant Portal. - Custom CSS
Sometimes external tags like div, p or span tags styles override Scalapay default styles. To handle these types of issues you can use the custom CSS field to facilitate the design processes. You can also use it to define inline style classes, such as font, size or alignment. These styles will apply to Scalapay description across all pages: product, cart and checkout pages. - Enable digital/virtual products
You can use this field if on your store you have digital/virtual products and you want to enable Scalapay on them.

General settings
Enable the product(s) agreed by the contract
PRODUCT TO ACTIVATE
Only the product/the products agreed as per contractual terms can be activated.
For any information or clarifications about the products to activate, please refer to your Scalapay Sale referent or the Integration Manager.
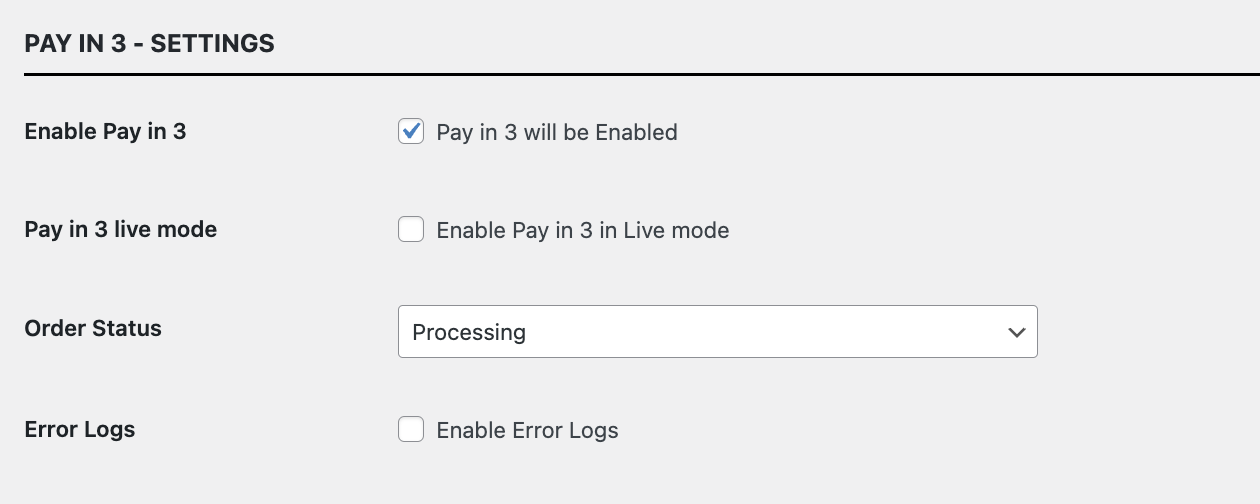
When the plugin is installed, the Pay in 3 and the Pay in 4 are disabled by default.
To activate the product agreed by your contract, you will have to:
- Enter the product tab of your interest (as per contractual terms)
- Enable the product
- Configure it and test the plugin (for the configuration see the instructions below)
Once the testing phase has been completed, you will be provided with the Live API Key and you will be able to activate the plugin in Live mode.
Enable the product agreed by the contract
❤ Restriction settings
Each product has a Restriction settings section.
Here's the list of all the settings that allow you to configure, test and then activate in Live mode the plugin.
- Scalapay minimum amount and Scalapay maximum amount
These fields allow you to adjust the default minimum and maximum amount, according to your contractual terms. The minimum amount for displaying the Scalapay plugin and accepting payments is set to 5€. - Enable on specific countries
The authorised countries are Austria, Belgium, Finland, France, Germany, Holland, Italy, Portugal and Spain. - Enable on specific currencies
The only authorised currency is Euro. - Restrict for specific categories
This field allows you to select the product categories you want Scalapay to be activated on. - Show Split fee
Check whether your contract includes split fees and for which specific product. Enter the tab of each product (Pay in 3 and Pay in 4) and choose the correct configuration according to your contract. Enable the Split fee option to activate the split fee.

Restriction settings
❤ Split fee
ENABLE THE SPLIT FEE OPTION
According to your contract with Scalapay, split fees may be applicable or not.
During the process of configuring the Scalapay widget, check whether your contract includes split fees and for which specific product. Enter the tab of each product (Pay in 3 and Pay in 4) and choose the correct configuration according to your contract. Enable the Split fee option to activate the split fee.

Enable the Split fee option if it's included by your contract
❤ Scalapay Widget
Each product has a Product page, Cart page and Checkout page settings section.
PRODUCT PAGE SETTINGS
The settings in this section allow you to customise the Scalapay widget on the Product page.
- Price selectors and Widget position
These fields are set by default. If your theme is customised, please verify the correct selectors. - Hide widget
This field is available but we recommend not to use it as the Scalapay widget is an extremely important asset for increasing conversion and average order value.

Product page settings
CART PAGE SETTINGS
The settings in this section allow you to customise Scalapay widget on the Cart page.
- Price selectors and Widget position
These fields are set by default. If your theme is customised, please verify the correct selectors. - Hide widget
This field is available but we recommend not to use it as the Scalapay widget is an extremely important asset for increasing conversion and average order value.

Cart page settings
❤ Checkout page
The settings in this section allow you to customise the Scalapay widget at checkout page.
- Price selectors and Widget position
These fields are set by default. If your theme is customised, please verify the correct selectors. - Show title and Hide instalment amount
These fields allow you to customise the checkout visualisation as follows.
DIFFERENT POSSIBILITIES
- "Show title" enabled, "Hide instalment amount" disabled (default settings):

- "Show title" enabled, "Hide instalment amount" enabled:

- "Show title" disabled:


Checkout page settings
Updated 4 days ago