Magento 2
Scalapay provides a ready-to-install extension for Magento 2 stores.
❤ Plugin installation
❤ Plugin configuration
❤ Split fee
❤ Scalapay widget
❤ Checkout page
COMPATIBILITY
The Scalapay plugin is compatible starting from the 2.2.2 Magento version.
❤ Plugin installation
Please follow the instructions below to install our plugin.
- Login via SSH to your server
- Go to the Magento root
- Enable maintenance mode by running
php bin/magento maintenance:enable - Download the module by running
composer require scalapay/scalapay-magento-2 - Enable the module by running
php bin/magento module:enable Scalapay_Scalapay - Apply database updates by running
php bin/magento setup:upgrade - Deploy the static content by running
php bin/magento setup:static-content:deploy - Compile the source by running
php bin/magento setup:di:compile - Clear the cache by running
php bin/magento cache:clean - Disable maintenance mode by running
php bin/magento maintenance:disable
❤ Plugin configuration
Configure and enable the Scalapay Plugin
To configure and enable the Scalapay plugin, please follow this path:
Stores (on the left side menu) → Configuration → Sales → Payment Methods
You will find a dedicated drop-down section for each of the Scalapay available products: Pay in 3 and Pay in 4.
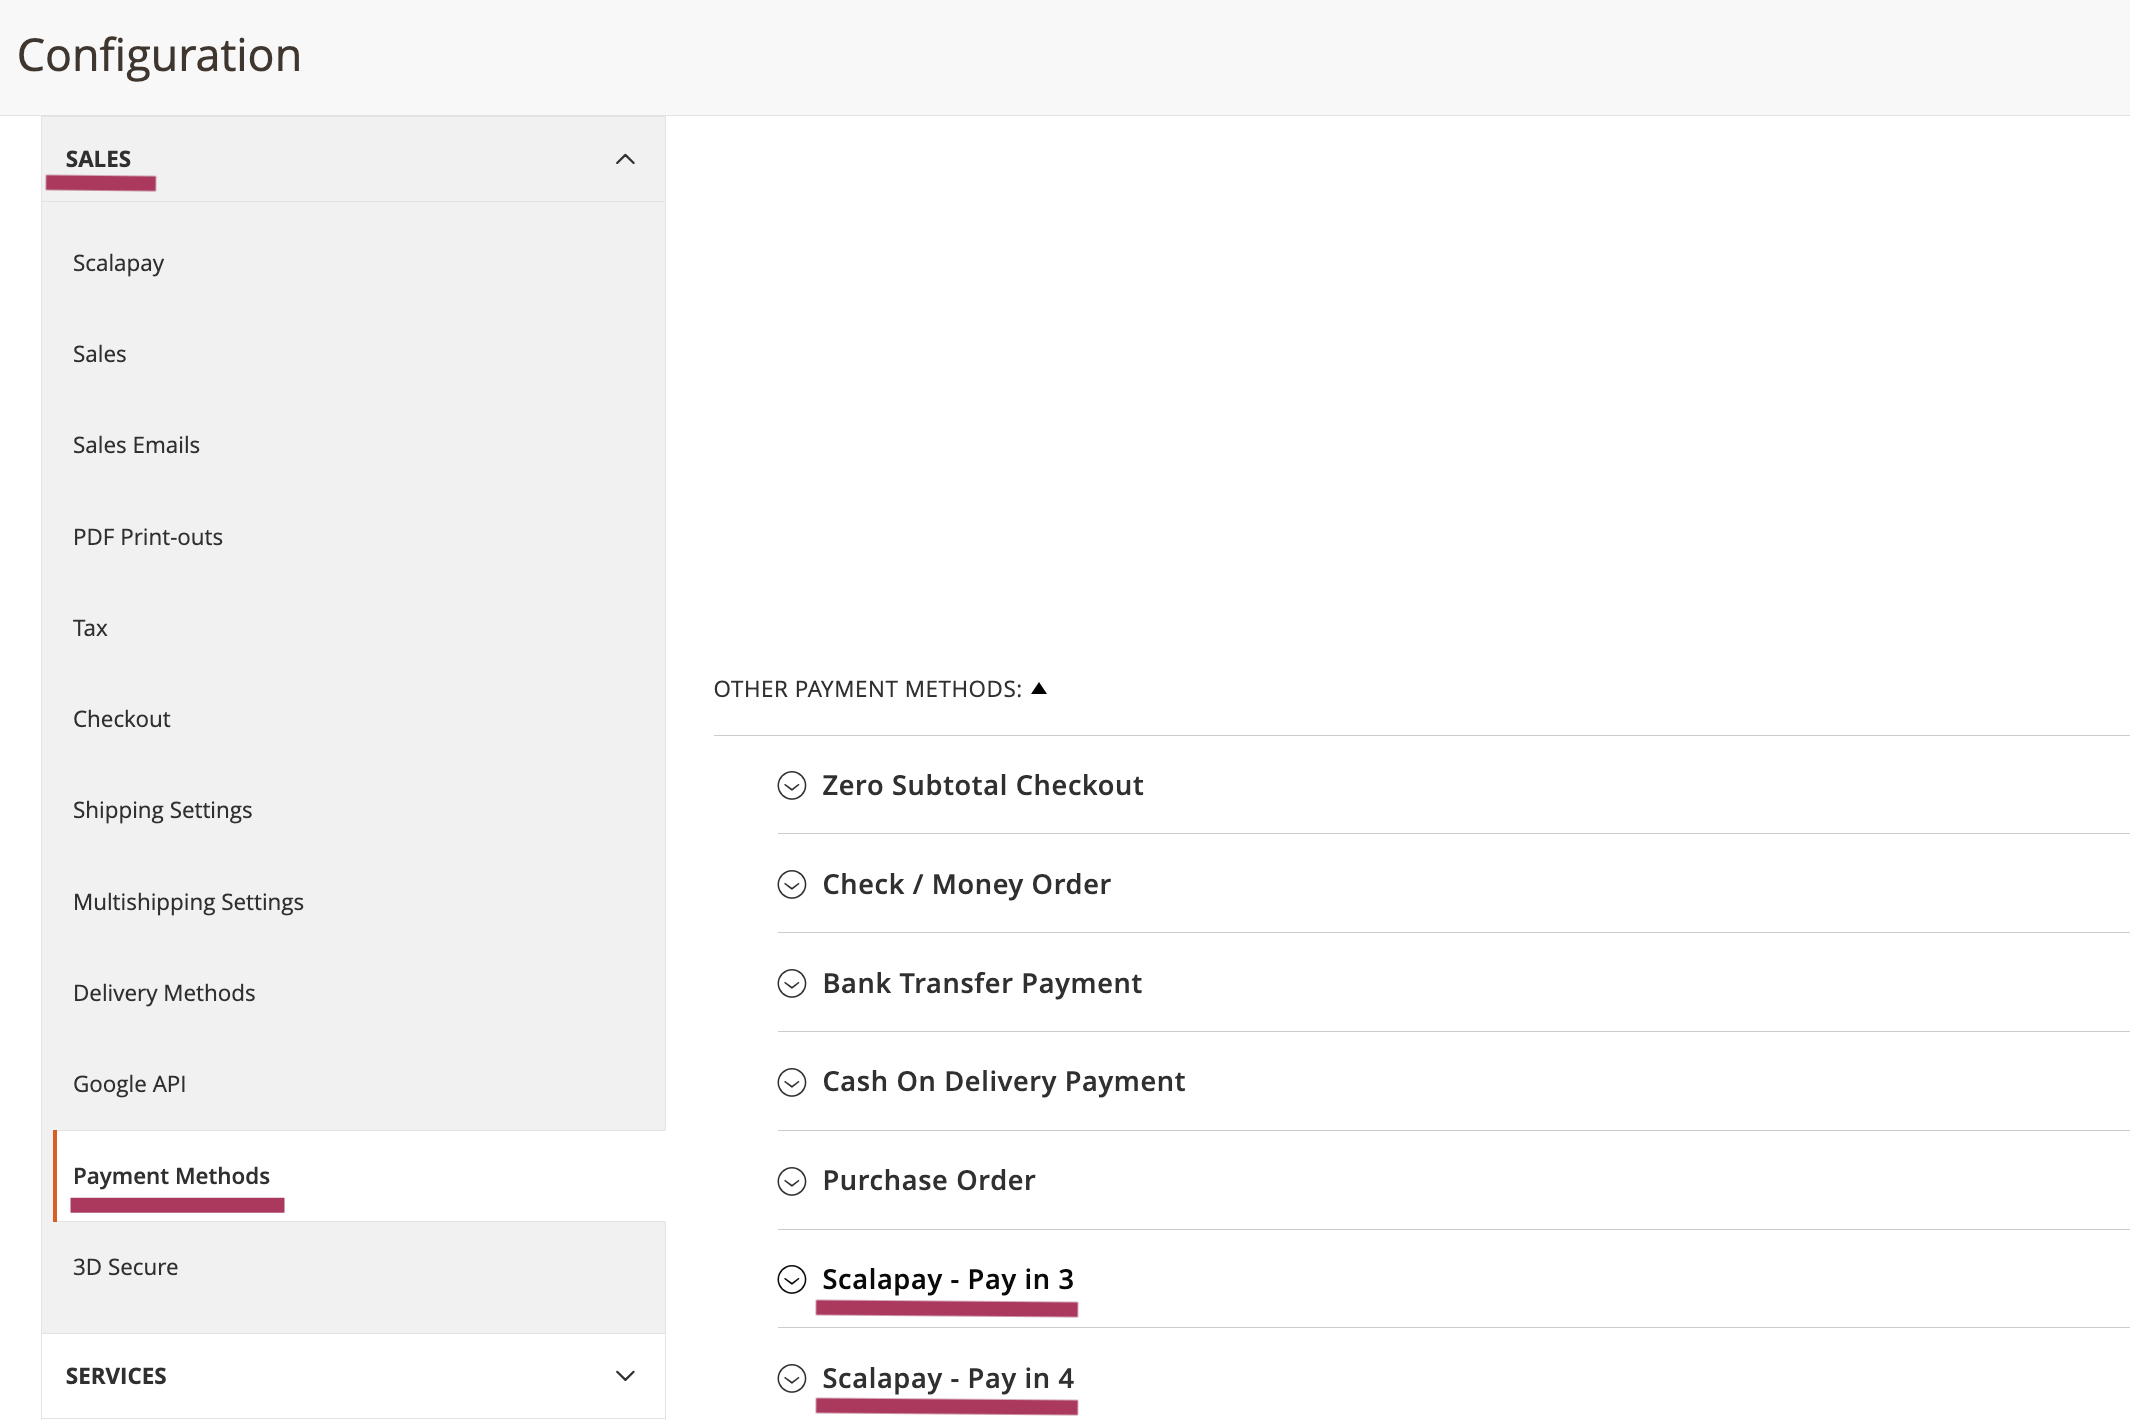
Enable the product(s) agreed by the contract
When the plugin is installed, the Pay in 3 and the Pay in 4 are disabled by default.
To activate the product agreed by your contract, you will have to:
- Enter the product tab of your interest (as per contractual terms)
- Enable the product
- Configure it and test the plugin (for the configuration see the instructions below)
Once the testing phase has been completed, you will be provided with the Live API Key and you will be able to activate the plugin in Live mode
PRODUCT TO ACTIVATE
Only the product/the products agreed as per contractual terms can be activated.
For any information or clarifications about the products to activate, please refer to your Scalapay Sale referent or the Integration Manager.
Here's the list of all the settings that allow you to configure, test and then activate in Live mode the plugin.
- Enable/disable Scalapay in Live mode
The Test API key is present by default and will allow you to test the correct plugin functioning.
Once the testing phase is completed, you will be provided with the Live API Key and you will be able to activate the plugin in Live mode. - Test API key
When you install the plugin, the general test API key is set by default: qhtfs87hjnc12kkos. - Test merchant token (field present from version 3.5.0)
When you install the plugin, the general test merchant token is set by default: 8KDS3SPEL. - Enable/disable Delayed capture
The plugin features the Delayed capture option: this feature can be activated per product. - Scalapay Minimum amount - Scalapay Maximum amount
These fields allow you to adjust the default minimum and maximum amount, according to your contractual terms. The minimum amount for displaying the Scalapay plugin and accepting payments is set to 5€. - Category restrictions
This field allows you to select the categories you want Scalapay to be activated on (we suggest you activate Scalapay on all the categories). - Product type restrictions
This field allows you to select the product categories you want Scalapay to be activated on. - Authorised countries
The authorised countries are Austria, Belgium, Finland, France, Germany, Holland, Italy, Portugal and Spain. - Authorised currency
The only authorised currency is Euro.
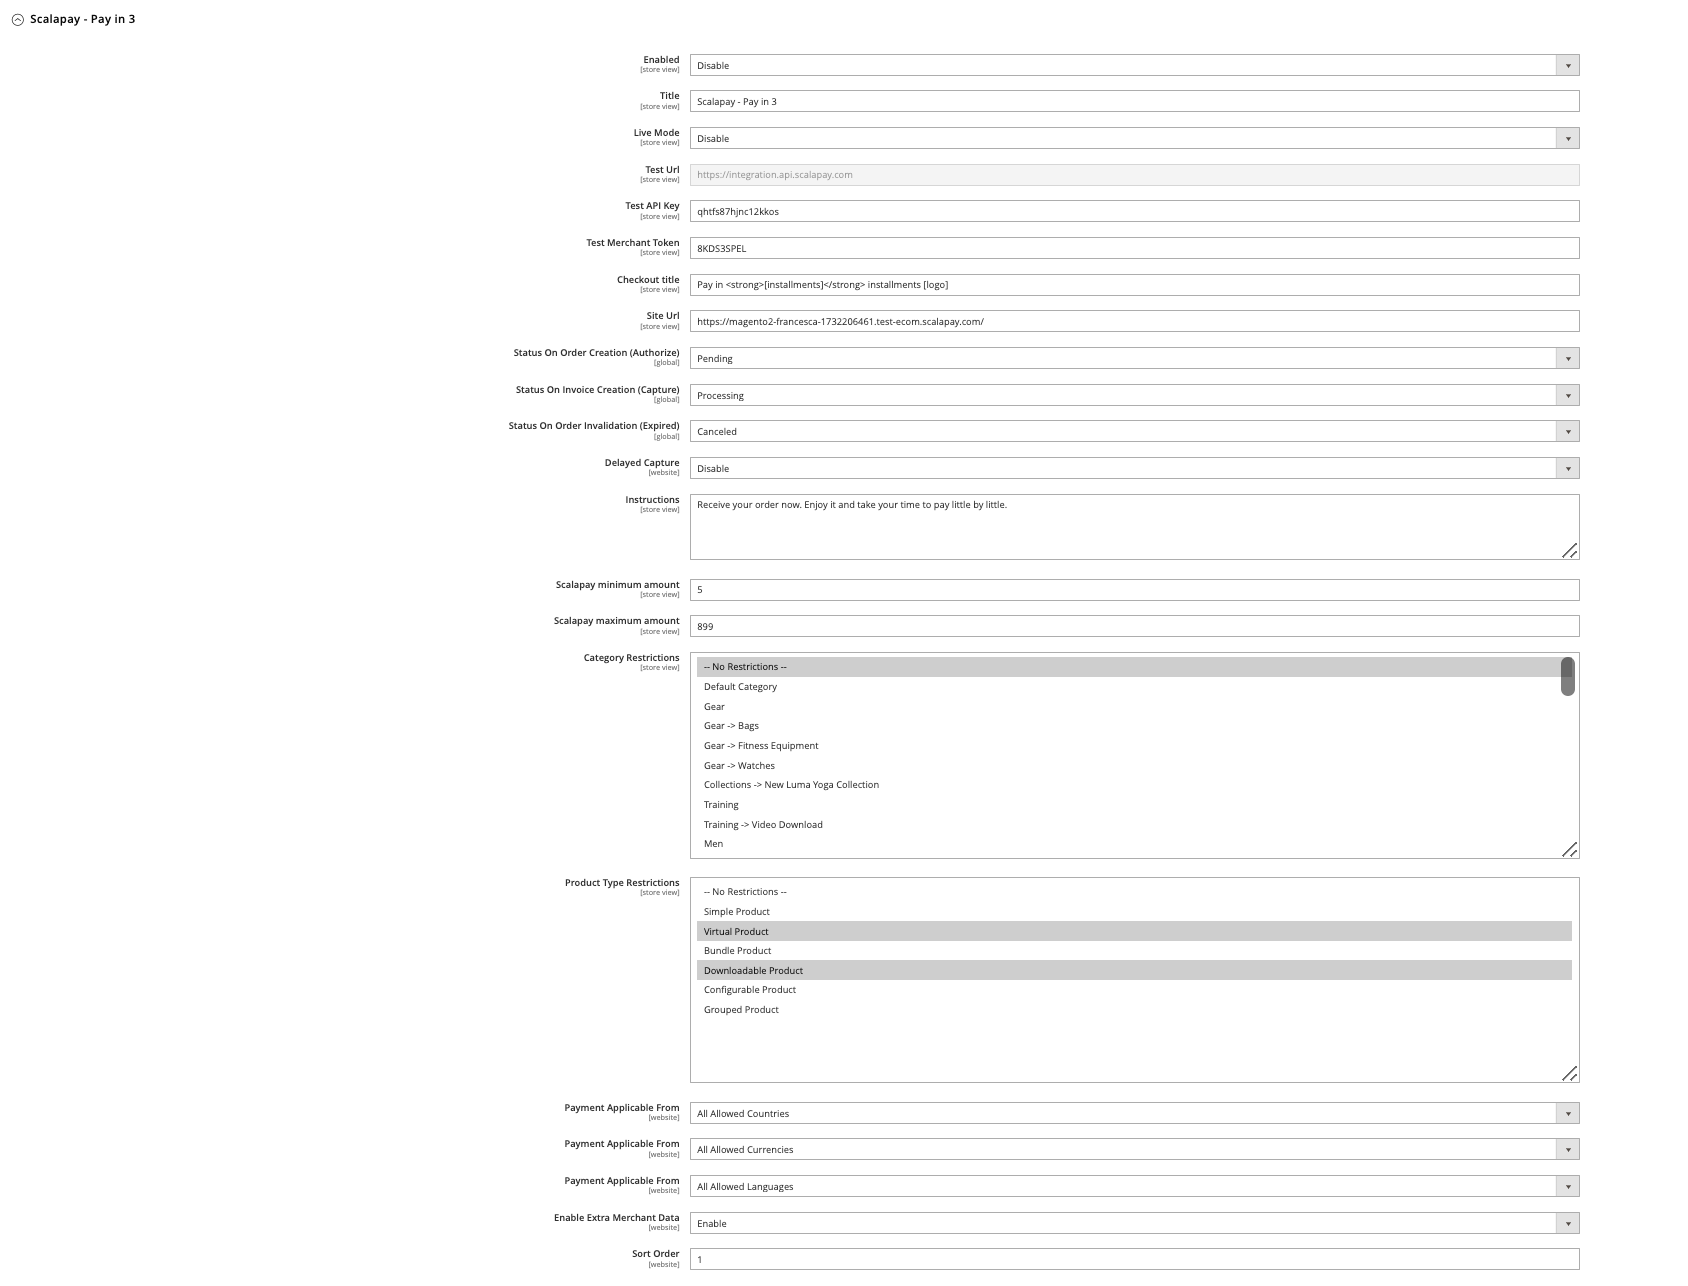
Pay in 3 settings
❤ Split fee
ENABLE THE SPLIT FEE OPTION
According to your contract with Scalapay, split fees may be applicable or not.
During the process of configuring the Scalapay plugin, check whether your contract includes split fees and for which specific product.
In order to activate the Split fee option, go to Stores → Configuration → Sales → Scalapay.
According to your contract, remember to enable the split fee option on the correct product (Pay in 3 - Pay in 4) and on the correct related page (product page, cart page, checkout page).
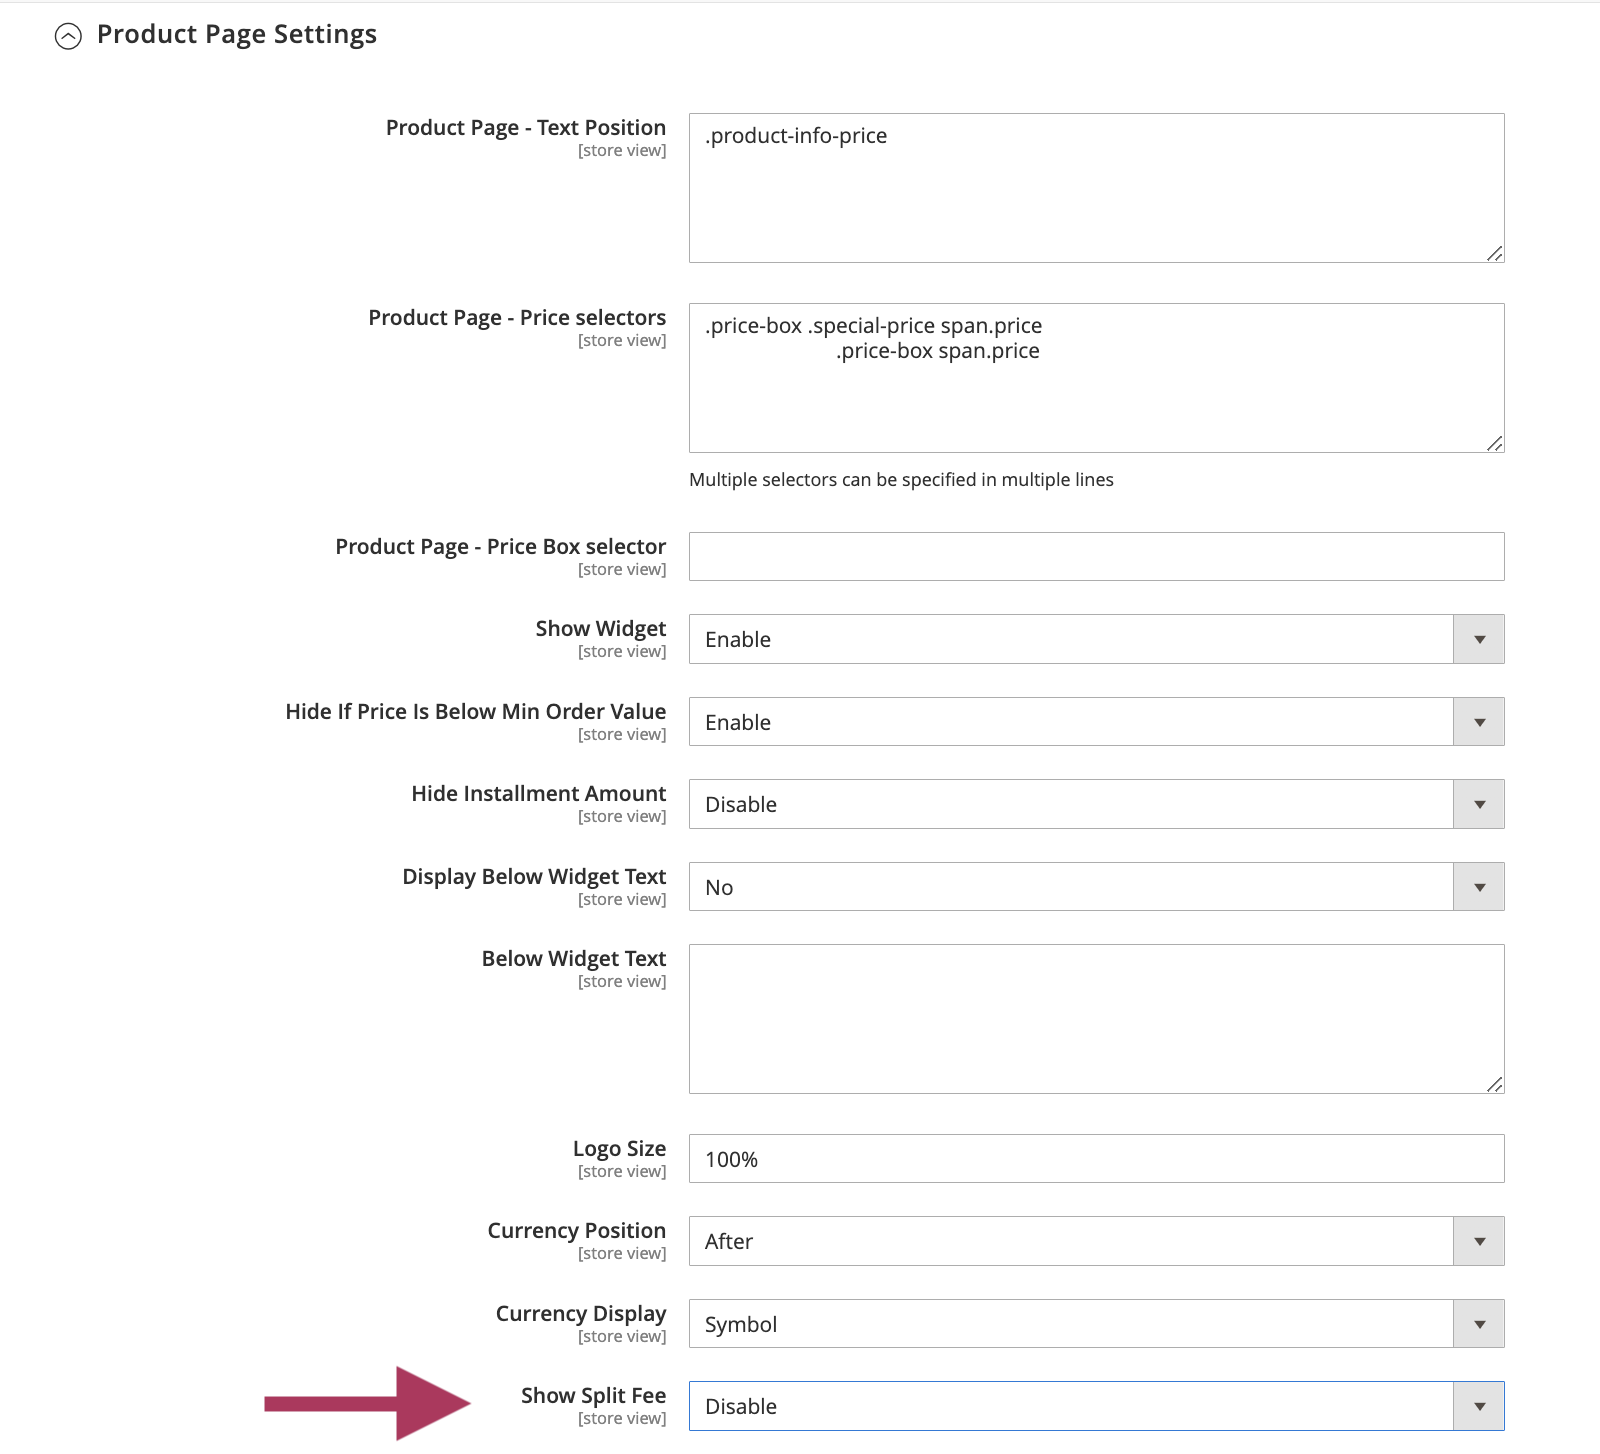
Product page settings: enable the Split fee option if it's included by your contract
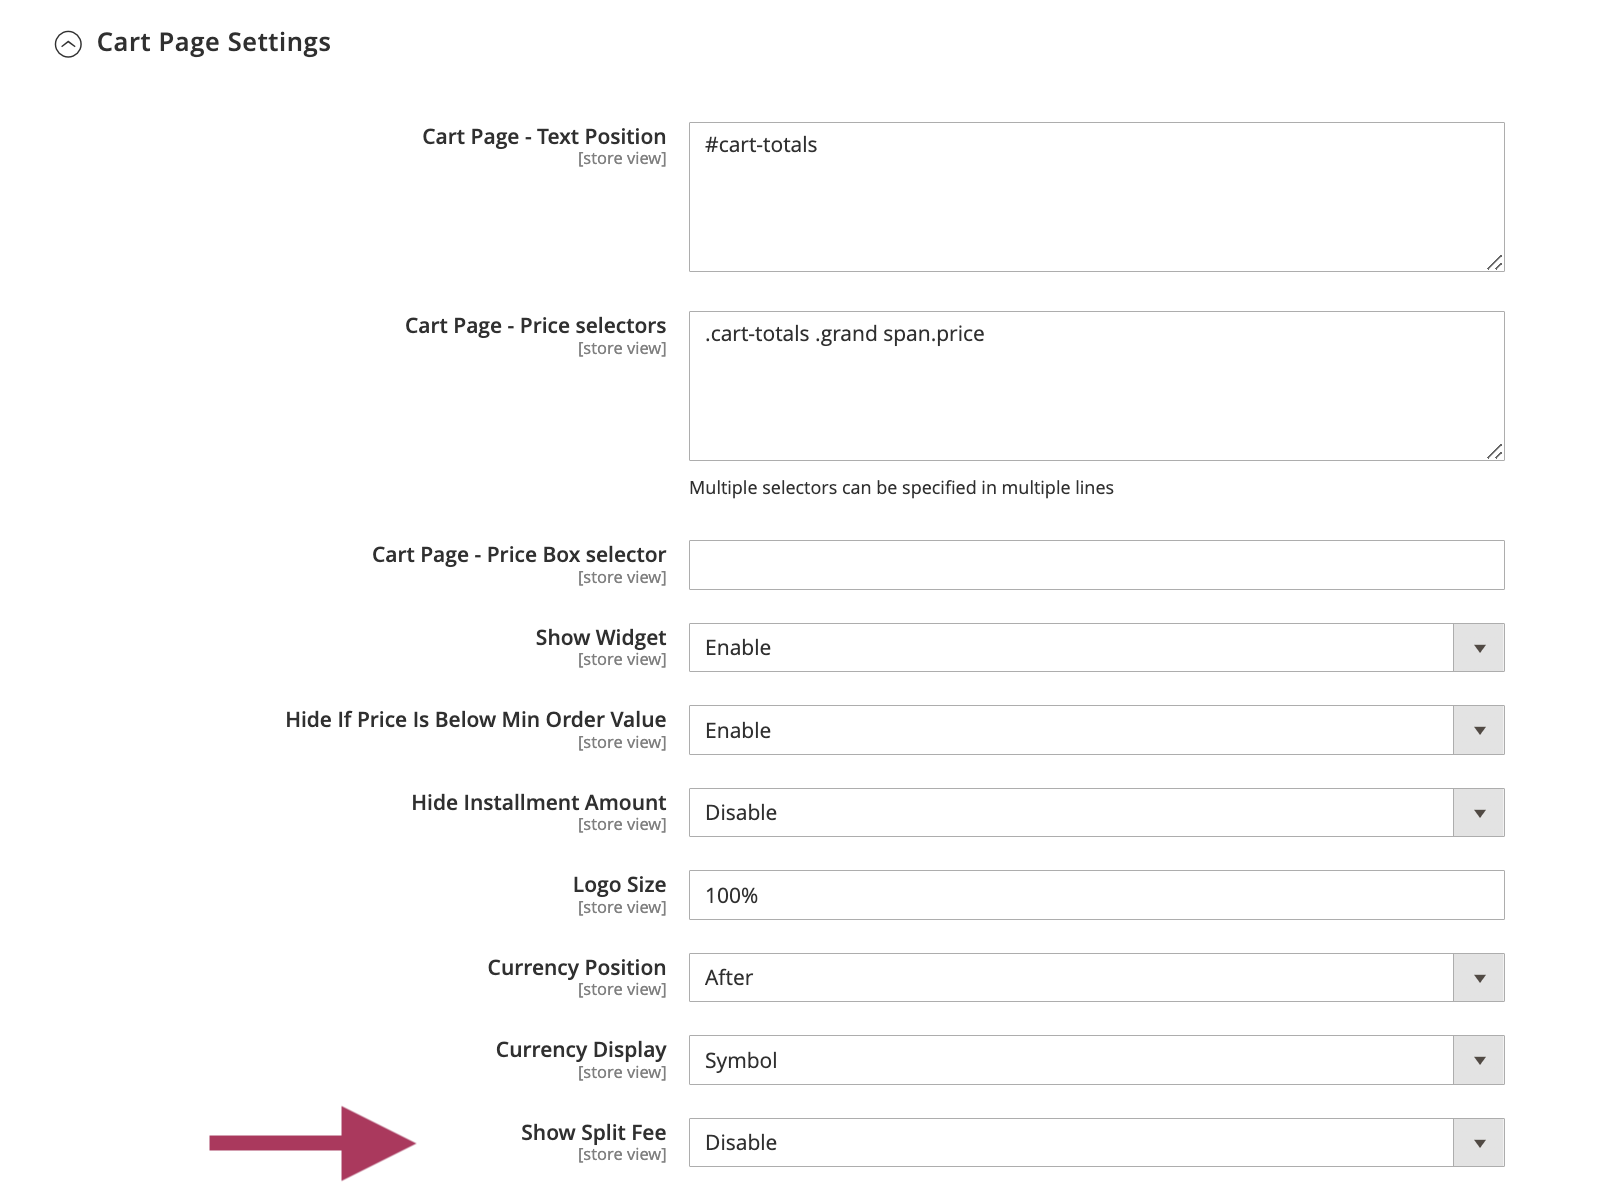
Cart page settings: enable the Split fee option if it's included by your contract
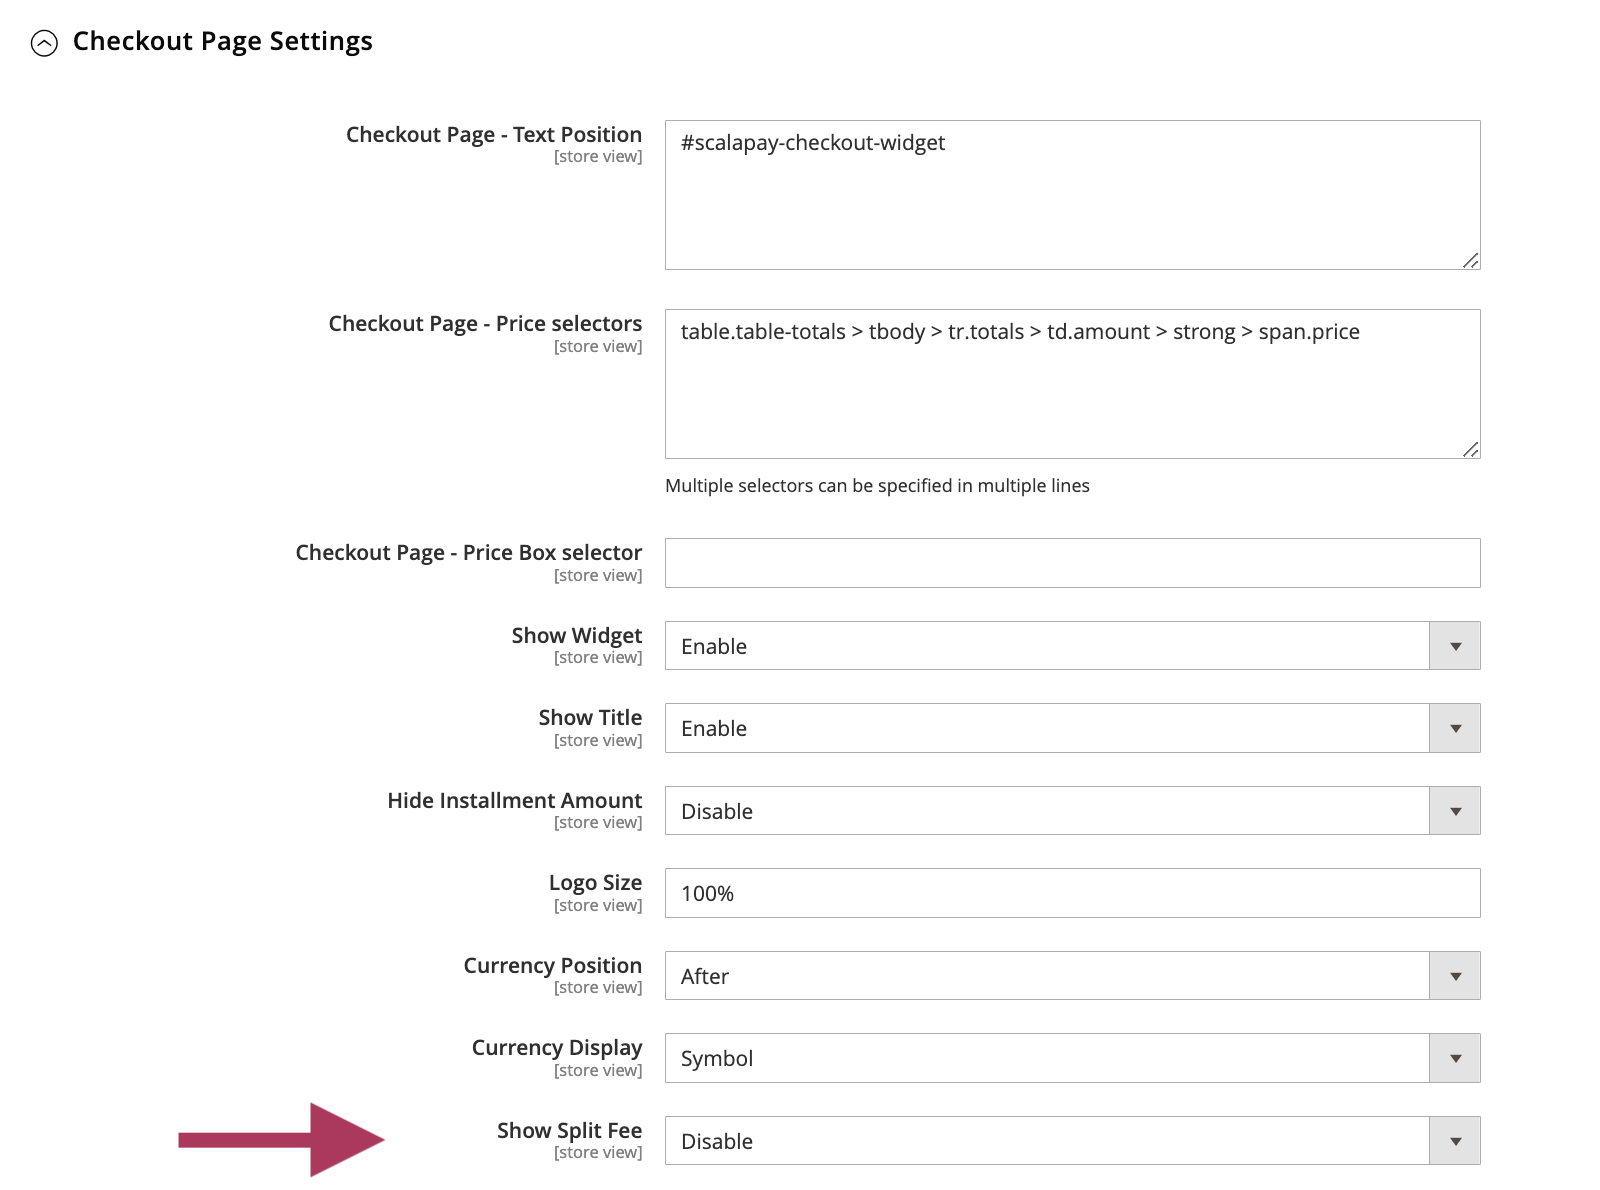
Checkout page settings: enable the Split fee option if it's included by your contract
❤ Scalapay widget
To configure and customise the Scalapay widget, please follow this path:
Stores (on the left side menu) → Configuration → Sales → Scalapay
You will find a dedicated dropdown section for each of the Scalapay available products: Pay in 3 and Pay in 4.
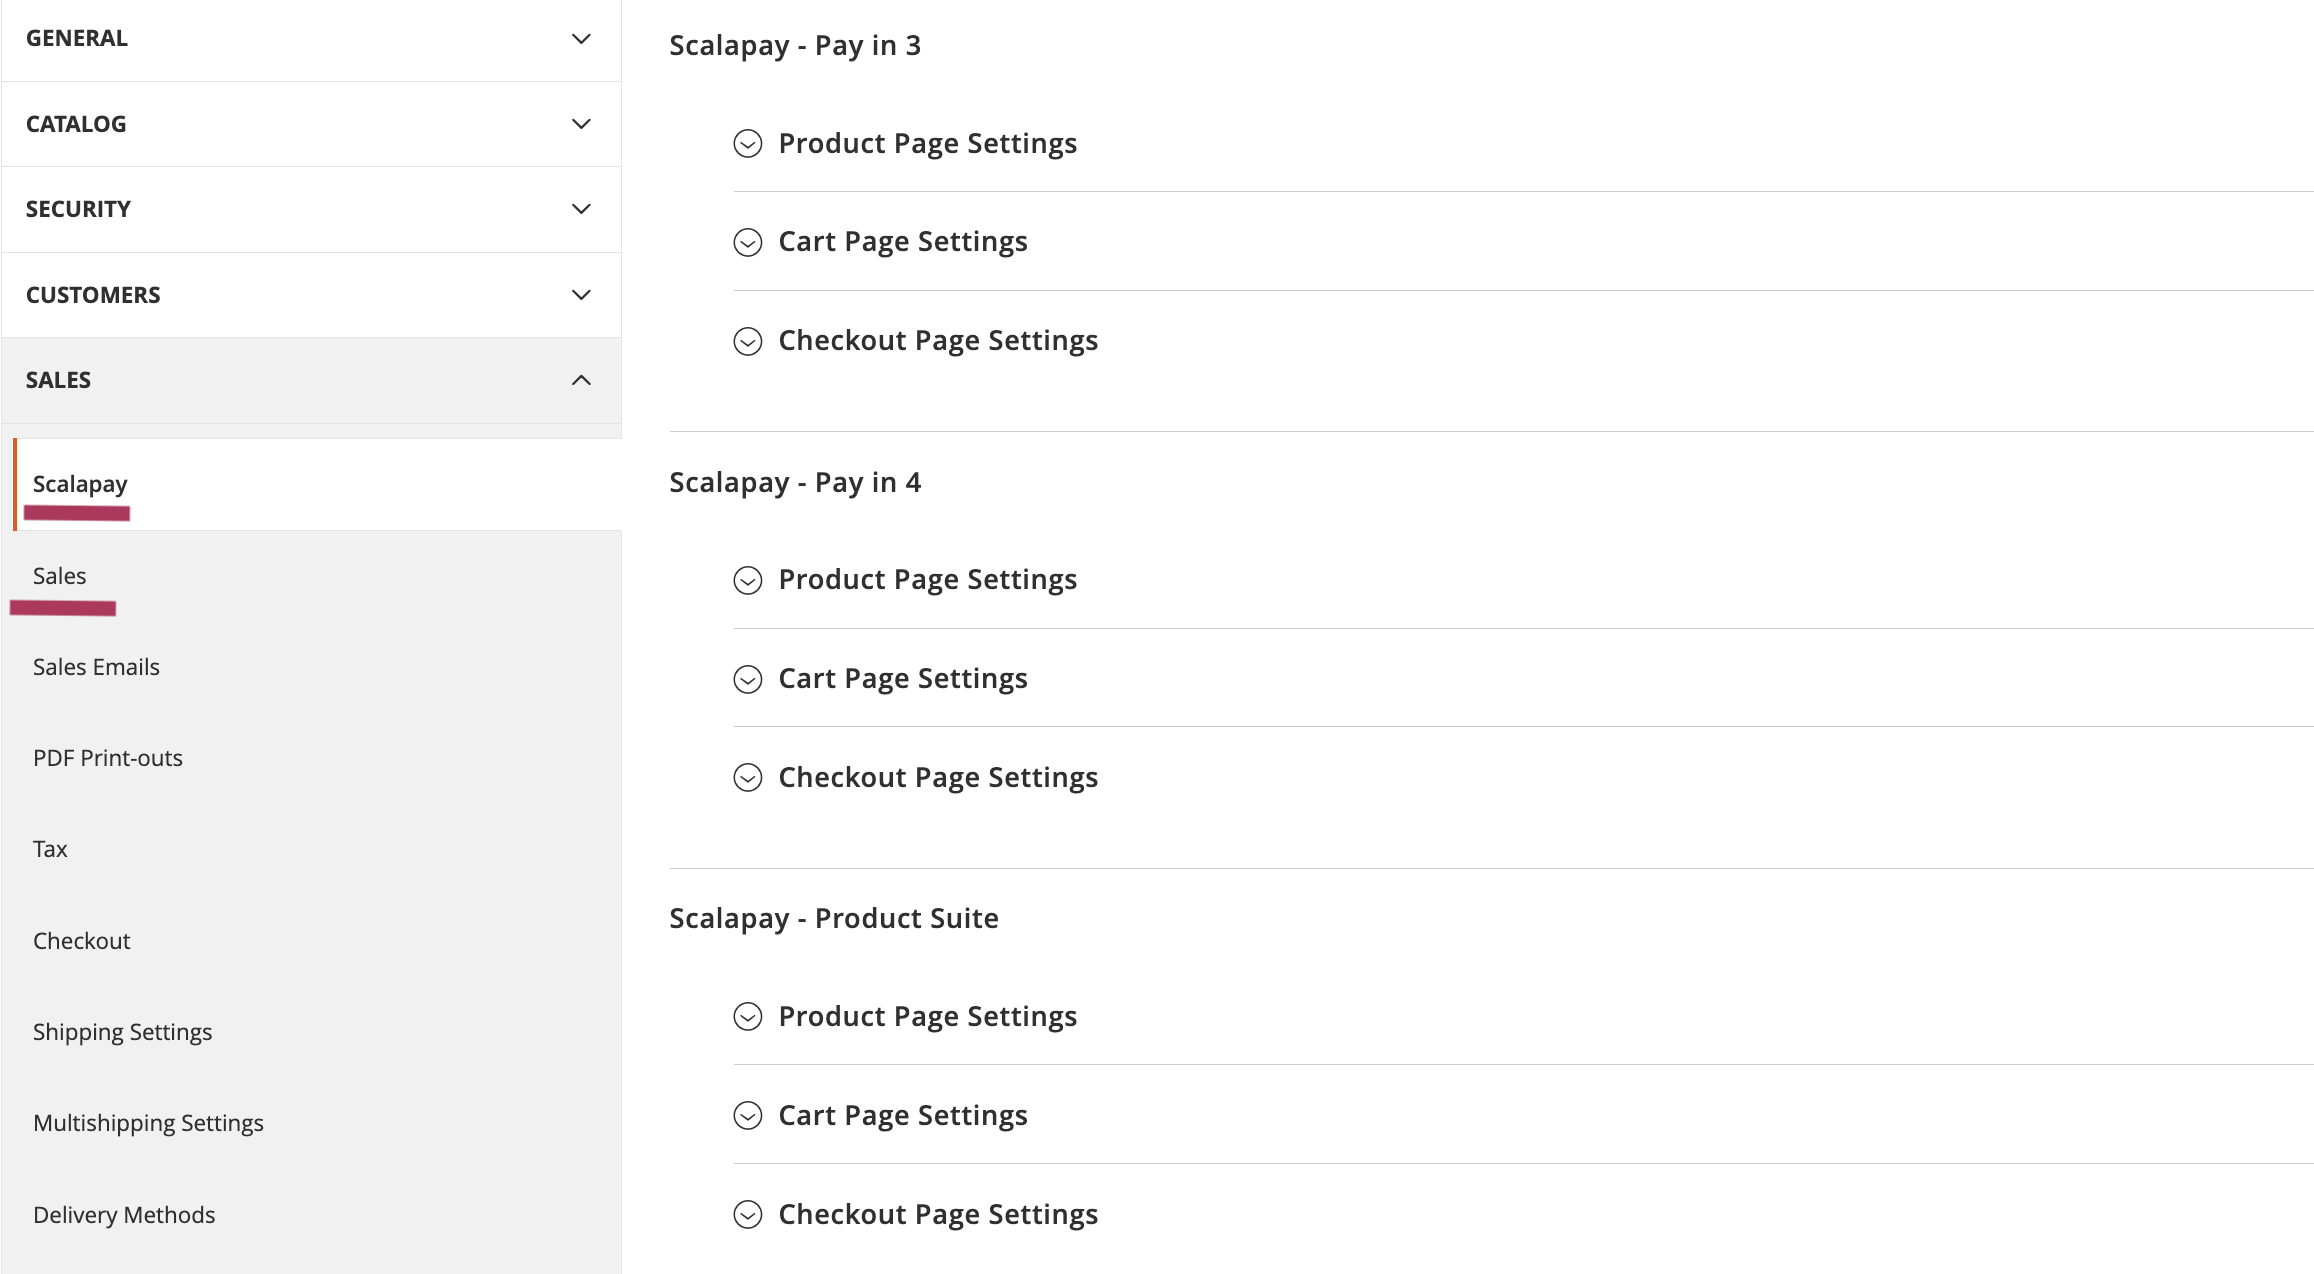
This section allow you to configure and customise the Scalapay widget on Product page, Cart page and Checkout page.
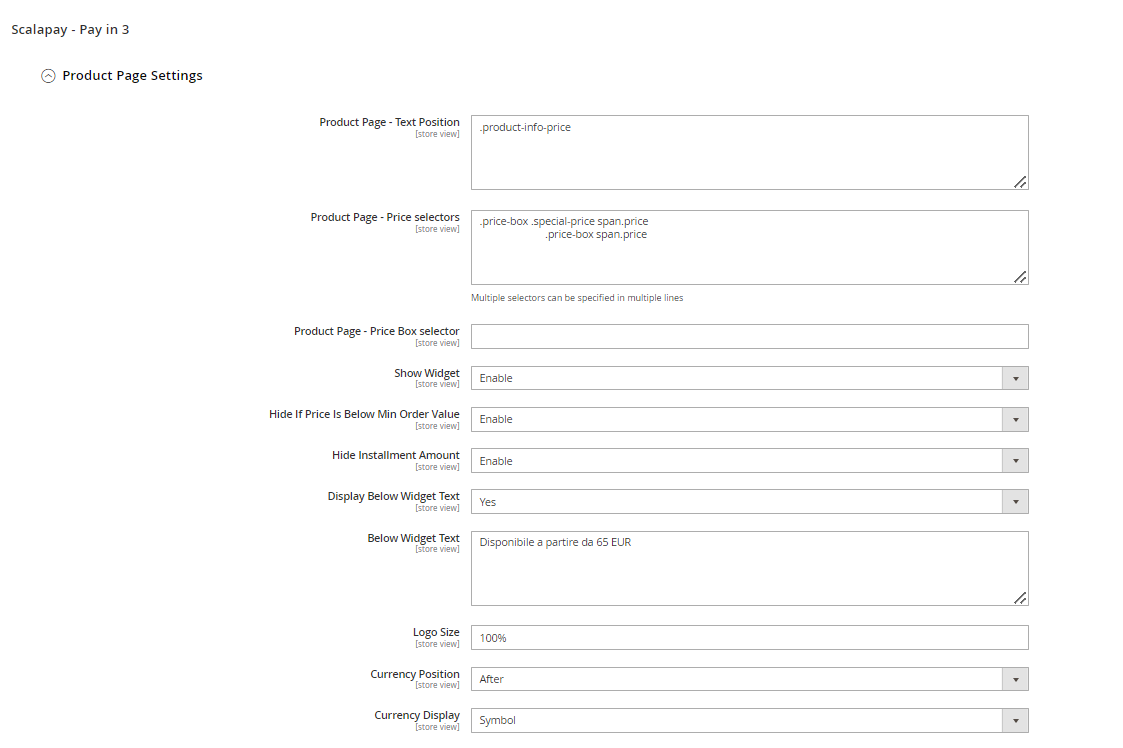
Product page - Price selectors
The Price selectors field is used to add a class or a combination of class pairs to get the final product price to which apply the Scalapay instalments.
To identify and set the correct selectors, inspect the price element to retrieve the correct price class name. You can also add multiple price selectors by separating them with commas.
To add a new price css selector, add new selectors in order of priority to use. Find all your price selectors (normal price, special price etc) and paste them in the box, separated by a comma.
Use the third box Product Page - Price Box Selector when prices are loaded by ajax. We recommend using the selector that doesn’t change dynamically.
❤ Checkout page
The settings in this section allow you to customise the Scalapay widget at checkout page.
- Price selectors and Widget position
These fields are set by default. If your theme is customised, please verify the correct selectors. - Show title and Hide instalment amount
These fields allow you to customise the checkout visualisation as follows.
DIFFERENT POSSIBILITIES
- "Show title" enabled, "Hide instalment amount" disabled (default settings):

- "Show title" enabled, "Hide instalment amount" enabled:

- "Show title" disabled:

Updated 17 days ago
