Magento 2
Scalapay provides a ready-to-install extension for Magento 2 stores.
Plugin installation
Plugin configuration
General settings
Payment configurations
Widget configurations
COMPATIBILITYThe Scalapay plugin is compatible starting from Magento version 2.2.2.
Plugin installation
Follow the instructions below to proceed with the plugin installation
- Login via SSH to your server
- Go to the Magento root
- Enable maintenance mode by running
php bin/magento maintenance:enable - Download the module by running
composer require scalapay/scalapay-magento-2 - Enable the module by running
php bin/magento module:enable Scalapay_Scalapay - Apply database updates by running
php bin/magento setup:upgrade - Deploy the static content by running
php bin/magento setup:static-content:deploy - Compile the source by running
php bin/magento setup:di:compile - Clear the cache by running
php bin/magento cache:clean - Disable maintenance mode by running
php bin/magento maintenance:disable
Plugin configuration
To configure and enable the Scalapay plugin, follow the path below:
Stores (from the left-side menu) → Configuration → Sales → Payment Methods
A dedicated drop-down section for Scalapay will be available there.
General settings
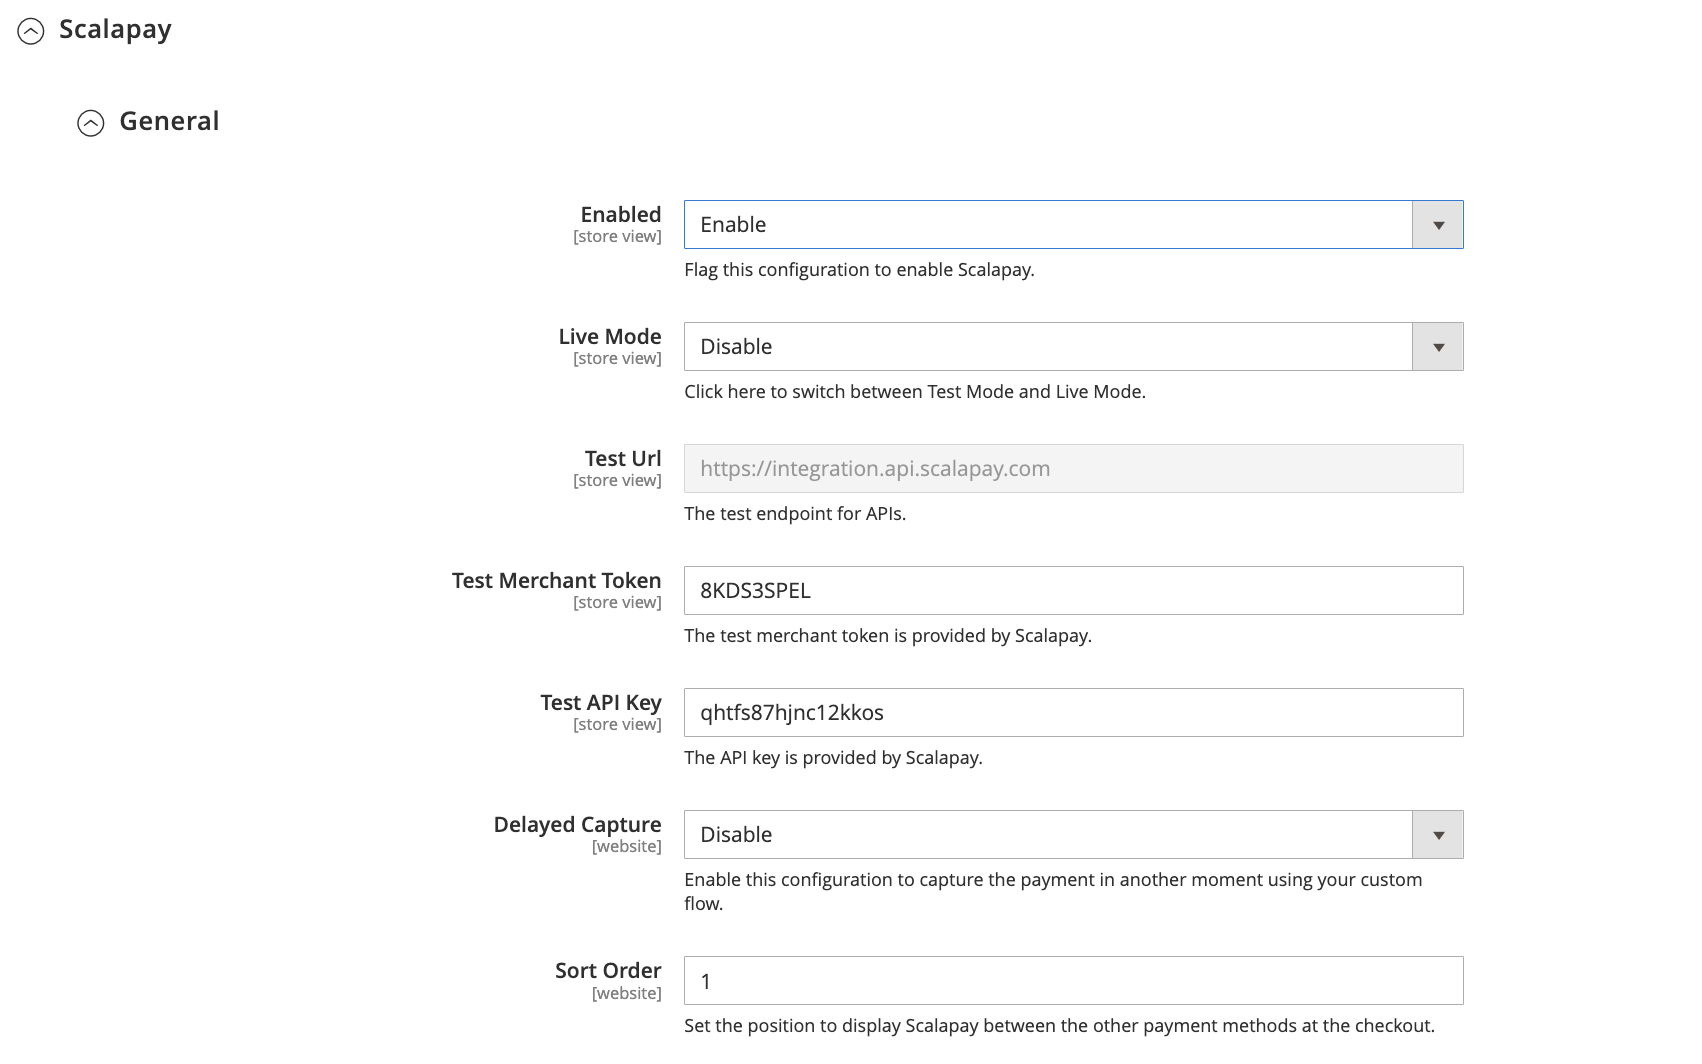
This section contains the plugin's general settings, and the Live API key can be added once the plugin has been correctly installed, configured, and tested.
- Enable/disable Scalapay in Live mode
The Test API key is provided by default and allows testing of the plugin functionality. Once the testing phase is completed, the Live API Key will be provided, enabling activation of the plugin in Live mode. - Test API key
When the plugin is installed, the general test API key is set by default: qhtfs87hjnc12kkos. - Test merchant token
When the plugin is installed, the general test merchant token is set by default: 8KDS3SPEL. - Live merchant token
Once the testing phase has been completed, the Live merchant token will be provided, allowing the plugin to be activated in Live mode. The merchant token can be found in the "Developer" section of the Scalapay Merchant Portal. - Live API key
Once the testing phase has been completed, the Live API key will be provided, allowing the plugin to be activated in Live mode. The Live API key can be found in the "Developer" section of the Scalapay Merchant Portal. - Enable/disable Delayed capture
The plugin includes the Delayed Capture option, which can be activated on a per-product basis.

General settings
Payment configurations
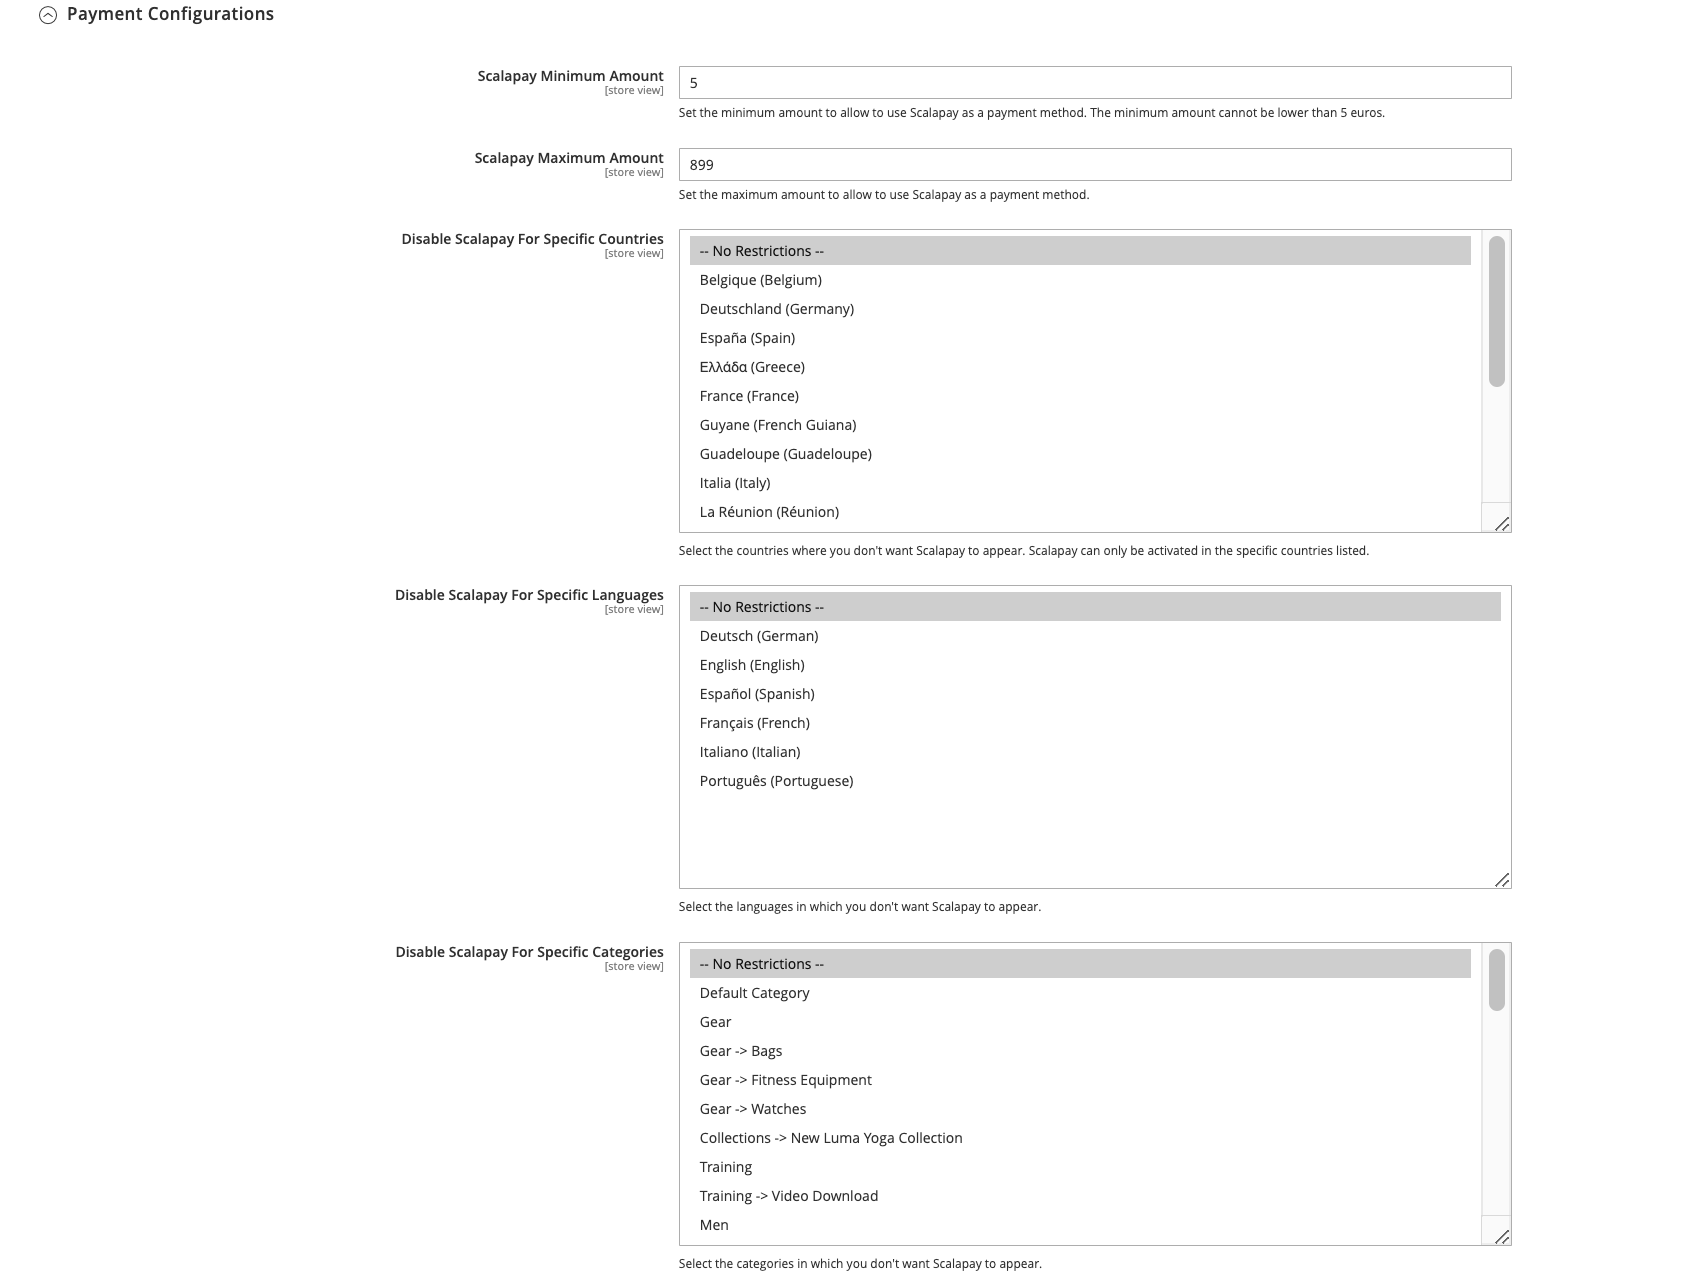
Here is the list of all configurations that allow setting up, testing, and then activating the plugin in Live mode.
- Scalapay Minimum amount and Scalapay Maximum amount
These fields allow adjustment of the default minimum and maximum amounts, according to contractual terms. The minimum amount for displaying the Scalapay plugin and accepting payments is set to 5€. - Disable Scalapay for specific countries
Select the countries where Scalapay should not appear. The authorised countries are Austria, Belgium, Finland, France, French Guiana, Germany, Guadeloupe, Italy, Martinique, Mayotte, Netherlands, Portugal, Réunion and Spain. - Disable Scalapay for specific categories
This field allows selection of product categories in which Scalapay should not appear.

Payment configurations
Widget configurations
1. Product page settings
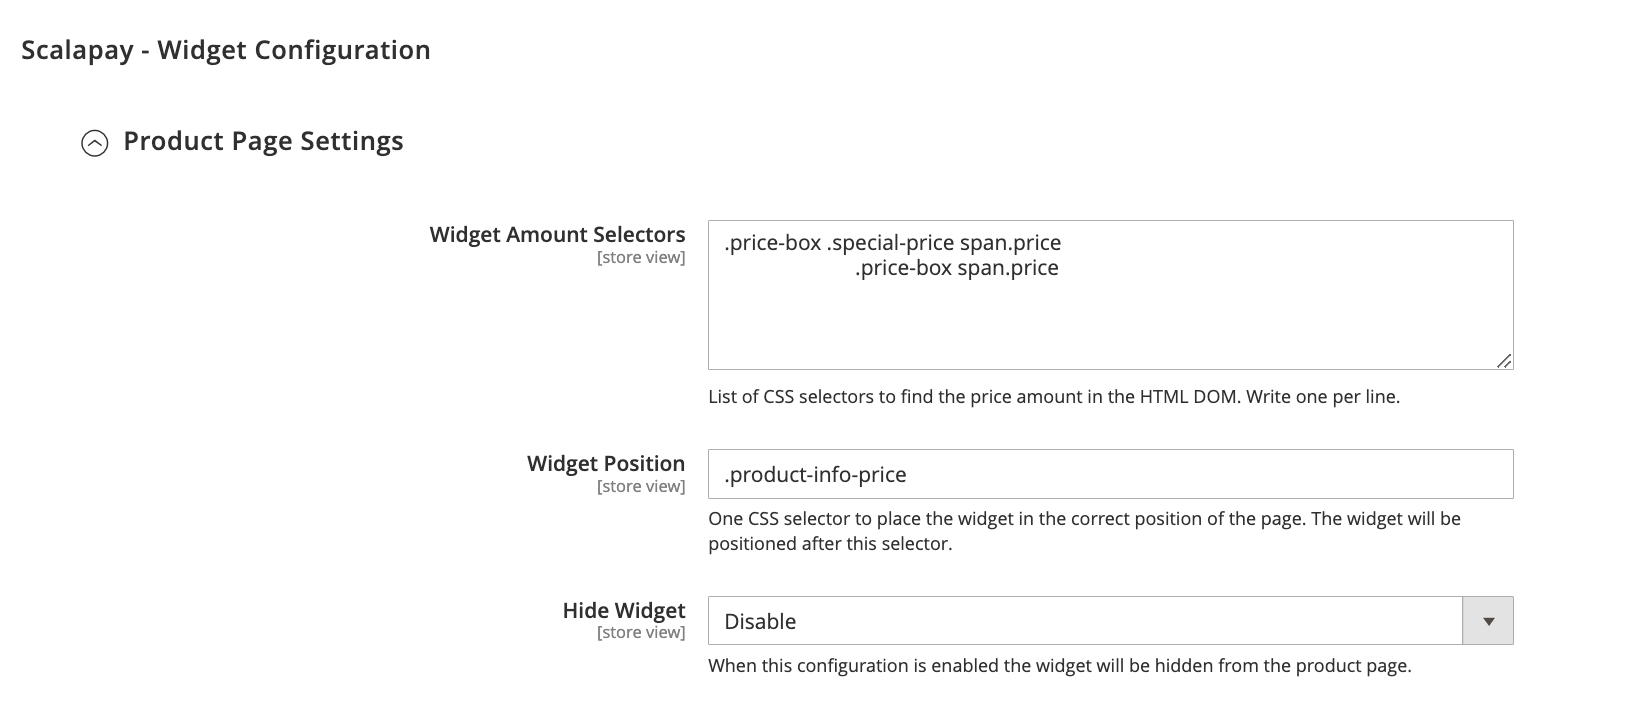
The settings in this section allow customisation of the Scalapay widget on the Product page.
- Widget amount selectors and Widget position
These fields are set by default. If the theme is customised, it is recommended to verify the correct selectors. - Hide widget
This field is available but its use is not recommended, as the Scalapay widget is an important asset for increasing conversion rates and average order value.

Product page settings
Price selectorsThe Price selectors field is used to add a class or a combination of class pairs to identify the final product price to which Scalapay instalments will be applied.
To determine and set the correct selectors, inspect the price element to retrieve the appropriate price class name. Multiple price selectors can be added by separating them with commas.
To add a new price CSS selector, enter the selectors in order of priority. Identify all relevant price selectors (e.g., normal price, special price) and paste them in the field, separated by commas.
2. Cart page settings
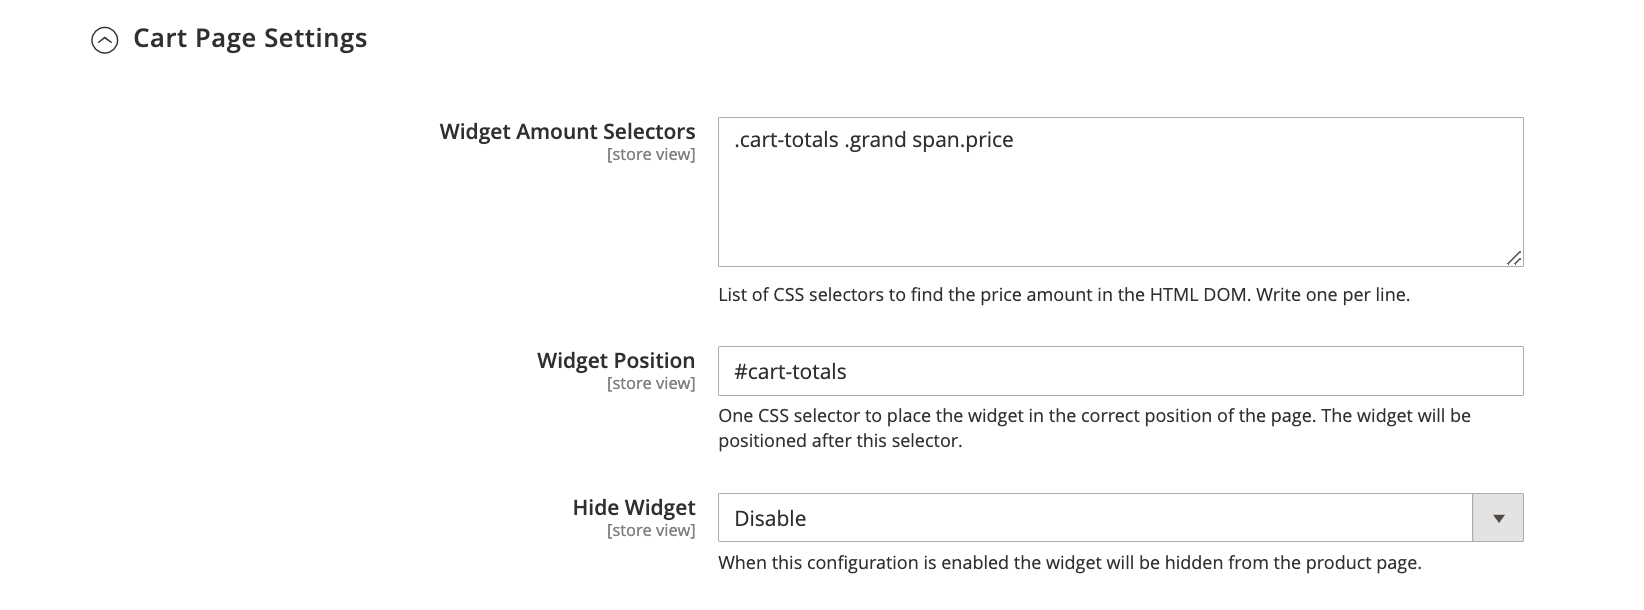
The settings in this section allow customisation of the Scalapay widget on the Cart page.
- Widget amount selectors and Widget position
These fields are set by default. If the theme is customised, it is recommended to verify the correct selectors. - Hide widget
This field is available but its use is not recommended, as the Scalapay widget is an important asset for increasing conversion rates and average order value.

Cart page settings
3. Checkout page settings
The settings in this section allow customisation of the Scalapay widget on the checkout page.
- Widget amount selectors
This fields are set by default. If the theme is customised, it is recommended to verify the correct selectors.

Checkout page settings
Updated 4 months ago
